Revised Spec trx 2.0

Trx 850 frame with rear side tubing removed. FCR41's with open bell mouths, single cable throttle, r6 1999 radiator fan removed, Full bore race exhaust from projection components. R1 aluminium front fairing frame, Modified R1 yokes with trx stem( projection components ), complete R1 front end. Nitron 3 way race shock, yzr750 rear end. Renthal 520 chain conversion race sprockets from Thundercat Modified cheapo 'Rear sets' lightweight from Thailand! Crankcase breather tube from generator and cylinder head to enclosed container under tank with filter. Modified R 7 fairing. A 2000 cbr6 glass fibre race seat. P&R racing GPS laptimer. Wiring loom kept original apart from the safety start soleniod removed....
Rear rain light fitted. clocks modified, just using Rev counter.

Weight TBA!

Wednesday 25 September 2013

Update not doing much.

been bit of a gap since my last post.....

Took me a month to get back to walking properly, which excluded me from doing any work on the bike( and the wife hasn't been too happy with the new baby and that) .....anyway...Well the front end has bent sideways, I have a suspicion that before I had the bike it could have been crashed before and straightened, so my next job will be to dismantle a much as possible and take a closer look at frame, yokes, forks.

Something that will take a while to do because I'm also doing up the house, spending time with the baby....racing will stop for a while, maybe a year and try again when I can afford to rebuild everything.
So I may also flip back to my other blog, the Vfr and tinker with that because that is still in one piece, could try and develop that....if my forks and yokes are salvageable I could transfer to the Vfr as they are 50mm longer than the current cbr954 forks.

Stay tuned.

Tuesday 30 July 2013

Donington disaster...bummer

The bike was going perfectly well, just had the gearing right, maybe better with the 16 front sprocket, but as it stood on 15/42 it worked well, had some torque back so I Could match the faster bikes out of the corners. My lap times were coming down and I knew I had not even gone full on until a little red mist made me out brake another bike in Melbourne loop where I seemed to gain advantage, however the throttle response ( not a quick action throttle) was poor at low revs, maybe me messing with the ignition timing so I have to give a handful to make it rev past a certain point. While banked over still front brake on, coming off my hand was in a awkward position with the front brake and trying to twist the throttle past its pick up point , too much handful...I couldn't stop myself I knew I'd screwed up, it let go, the back end slid out so fast that and my body position made me let go of the throttle which made the rear stick and it pinged me out, summer salting onto the grass and tyre wall....I managed to wallop myself , bike went into the true wall, if that wasn't there it would have been ok but the front end took the brunt.

Spent some time in the medical centre for a check and X-ray, luckily nothing broken...

Someone videod the crash so I'm waiting to get hold of it to analyse and then ill put up here.

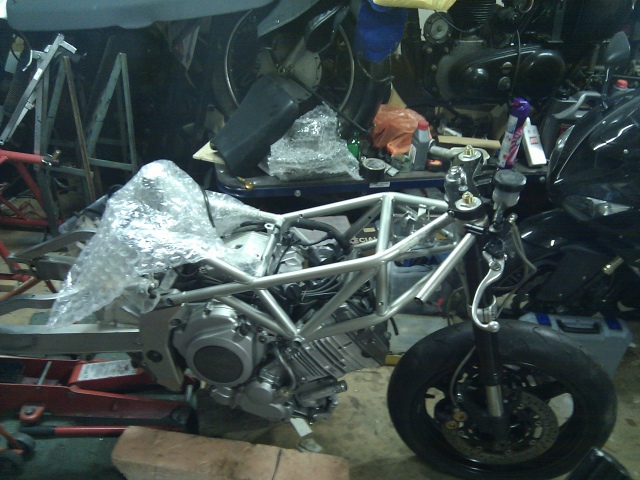
Once the bike was taken away from scutineering my mates tried in vain the get it back together, pictures shown...however when I went out for the next race I got as far as the sighting lap the footpeg pulled through its bolt hole and fell off, so I had no gear change either...back out again once fixed and the bike felt really strange, Craner curves nearly ended my go, I limped back and took the bodywork off to look closely at the bike.
This revealed a bent headstock and slightly bent forks.slackening the clamps and twisting the fork legs showed a slight tightening at a certain point.
Originally we thought the forks,had just twisted around so we undid everything and quickly moved them about until the wheel and clip owns looked straight.....

So I'm fed up and in the dumps, I know I should have been doing 1.48 around Donington gp if all went well.

At the moment I feel battered and bruised, I haven't even unpacked the van.


Monday 22 July 2013

Getting ready for Donington, 4 days and counting!

No time to change clutch plates, just haven't had time to do anything major, I've adjusted it as much as I can and just have to remember how agricultural it is compared to my zx10 clutch , which are poles apart in use. I will have to adapt quickly to it on Saturdays practice session. I think it will be the start that could be interesting with the clutch being very sensitive.
I plan to just go for it in the turns, keep the corner speed up as much as poss. Ill watch a few vids just to get it I to my head.
I've been round checking nuts and bolts, tightening up etc.
Topped up with oil
I've changed the red sprocket to a 42 , left the front on 15 as I haven't got a16 yet.
Used gearing commander website which is extremely useful.
At 9000 I should hit 212 kph, using a 16 front should increase to 226.

We will see!


Monday 24 June 2013

Entries posted off to Donington ! 26/27th July

Posted the entries off today, I've entered for thunderbikes and the all comers open class, 300 odd quid but I might as well because I don't think I can afford anything after this!..6 races. The bike is still in the van so I will take it out soon to tinker with the clutch, rear brake. Shame I've created a bike but won't be able to develop it much over the summer. At least it's a base to keep with and when I can afford more races ill develop it. Better get a lotto ticket this weekend!....the £ Is so low against anything else I just can't bring myself to buy anything anymore. I mean £1.00 is worth 1.18 euro, what's the point

At least here's my daughter preparing for motogp
Maybe I can send her on red ball rookies in Spain.

Friday 7 June 2013

First test at Donington completed

Well I took a day off work drove up to Donington wed night. 
Unpacked bike, had the usual briefing then it was out on track. Tyres warming, 29 rear, 28 front.
The first go out anywhere was quite nerve racking as I was wondering what I hadn't done...
Soon to find after the first session..cut short for some poser on his fireblade (new) high sided on the entrance to the start straight.
Luckily this proved good for me because the footpegs came undone, the lever ends came undone...
Sorted..
Next the bikes gearing was way too low...I knew it but couldn't get the other sprockets in time.
The bike lost all its torque curve as it was too low geared. It wouldn't rev past 7250 something to look at because I had done the tps mod...maybe not correctly.
Stupid errors , not doing stuff up!!......the gear lever spline bolt was loose, preventing me on getting any gears ...then braking hard into Melbourne loop the drive sprocket nut came off...luckily the Marshall found it so ...try again.

Double checked everything!! Spent the rest of the day getting heldup by faster bikes in the sweeping corners and out braking but then they would blast past on their 180hp machines..annoying.

But I was really pleased with the way it handled, it felt stable, flicking left to right, Craner curves was just brilliant I ended up have to keep the throttle pinned all the way into and through Craner curves.

I was pleased that I could thrash it , throw it around for the rest of the day without crashing...just annoyed that the gearing was wrong.


Sunday 26 May 2013

Crankcase breather box

Crankcase breather container, quite ingenious, lightweight and tough. Just waiting for my tyres to come.

Thursday 16 May 2013

Ready...like my cheeky paint scheme...found a roll of gold sticky tape

Booked Donington for a test, 6th June, taking a personal day off work. Some thunderbike mates will meet me there so it should be a good day out. This will literally be the first try of the bike  with no previous tries down the back street....me being paranoid that the chances of getting caught it will be me...especially as there's CCTV everywhere so there's no escaping the evidence!

Spent a lot on tyres, some Dunlop qualifiers 2 for the zx10, and metzler racetecs k3 for testing, plus I've got some slicks that have life still in them if I flip them...and some part used Michelin wets that I got off fleabay.

For knee padding I used some 3mm foam padding from the local art shop, laser cut yamaha with a bold font, then bought why not stick the gold tape under the gaps of the wording..ingenious..

Friday 10 May 2013

Finished for now ready for testing

The trx is ready for its first test, I'm in Two minds whether to test at brands or donington. Ill probably do donington in early June because bemsee thunderbikes will go there at the end of July. It's quite pricey for a track day when I could go to snetterton for 50 quid less. Brands is always pricey but I'm familiar with the track so it might be a good idea to revisit donny as I haven't been there since 2003!

Sunday 28 April 2013

Footrests and chain

A few hours of tinkering and I managed to squeeze on my new 'yoshimura' ...rearsets ah..em..From Thailand. They are actually quite neat, very light, machined well apart from a few burs and heavy handed bearing placement but apart from that they look the part...seem sturdy enough...time will tell. All I had to do for the gearshift side was keep the universal joint from the original arm at the gearshaft end, use about 30mm of threaded 6mm bar which screwed into the Thai linkage to the original. The right hand side foot brake was trickier, I had to nibble a tiny amount away from the aluminium frame bolt holes because the hangers were 70mm apart and the Trx's are 73mm apart....why such an odd number....I also had to open the holes out a little on the hangers for the bolts to go in.The master cyclinder had to go in front of the hanger because of it fouling the frame.

The chain alignment...well I had to send the 110 link chain back to A&R racing as it was too short!...so if you use a 45 renthal thundercat sprocket and a 15 or 16 tooth front you will be .a link out!.....so get a 114 link chain. Alignment I found the rear sprocket is too far left, I tried packing the driver sprocket out but could only go about 7-8mm but it isn't enough!...so the only thought is to machine out where the rear sprocket sits....I looked on the trx forum but that seems to give differing advice...and that's for a yzf 750 rear..they suggest add 1mm washers to the sprocket and 4.1 for the front?..strange....
Really I think the best answer is to take the swingarm out and machine off some from the right hand side and pack out the left.


Sunday 21 April 2013

Footrests and fairing

Well my screen arrived and it looks like it will fit, so ill mark and drill some holes at some point. I've lost a bit of momentum and enthusiasm. Things not going the ways planned. The footrest of the left with a bit of jiggling will fit and I've temporarily fitted just to get the linkage the right length. These I admit are from Thailand, they look ok and need some tinkering to fit. They seem sturdy enough so will see!..the right side is the problem and ill take a pic of that later.
The fairing and tank I've painted ford puma black...lots of blacks out there but this has a pearlescent effect....the front fairing looks good and I have seemed to got that just right, no orange peel effect, a nice shine....the tank is different as I completely forgot about the petrol resistant lacquer after spraying it with normal lacquer...so sprayed over it with that causing it to bloom..bummer. I've told myself not to spend any more on paint...just get stickers to bung on it from now .

Annoyed too that the when I finally got around to fitting the chain....moving the rear wheel as far forward as possible..the chain still didnt fit..it's a link too short!!....after asking advice on the length...Witt the sprockets in mind too....another bum deal.....then coming off the zx10 on some loose pot holed surface Ive given up for a bit...going to do some decorating.


Sunday 7 April 2013

Comparison from fairing superimposed to actual

This pic shows the comparison between the virtual superimposed fairing and the actual one. The actual one is slightly squashed, has had the vent holes opened out to allow the fairing to be pulled inwards. The fixing holes have remained and I've ingeniously created some brackets that's hold the fairing in. Pics to follow of that.

So if you want a full fairing fitted to the trx...it only works with a lot of tinkering because these fibreglass fairing copies are not all the same as I've noticed comparing mine to West Country Windings trx.

Friday 5 April 2013

Fairing tweaking

Trying to fit this is proving tricky. Ive cut out some of the vents bigger so the engine can come through so I can pull in the fairing sides. I've rejigged the front fairing frame, I've had to cut off its fixing holes so I could re-position them. The fairing halves aren't a good match which makes it more awkward. Ive also cut a gap for the exhaust. I knew this wouldn't be easy. next would be to make some brackets to fix the sides and also pull the underside up. The radiator is fine so that can stay. A test of the forks under compression showed nothing fouling, but my nice mudguard may need a little shaving. When I've fixed those bits Ill have to some how pull the screen fixing s up . Also I will weld up the lock stops.


Wednesday 3 April 2013

Fairing has arrived!

The r7 fairing looks good, it's seems quite wide and the front nose cone looks slightly squashed so there's lots of little alterations needed. The r6 radiator maybe too high so I might have to revert to the old one or get a curved one...or just nibble a bit away from the fairing.Ive already taken some of the air vents and roughly cut them larger to try and pull in the sides.

Sunday 31 March 2013

The final idea should look like this with an R7 fairing

Well I know that the R7 fairing is waiting for me at work! So ill pop over and collect it on Tuesday!
This is the last piece ( I think) which I need to order before a test session, think I can make the rest. my first trial is to have it run at a track that I'm familiar with and compare times to the Vfr that I ran last year which had severe grounding problems and lack of HP.....( too short 954 fireblade forks causing footrests, fairing/ and later belly pan to hit the ground....nearly launching me on paddock hill bend).

At the mo, I'm a bit concerned that the exhaust will be the first casualty as it seems to stick out rather...wish it was a left hand exit type.

And the noise!...I even tried it today with the Db killer .... didnt make much difference compared yesterday's test.


Crankcase breather

Heres a pic, I've tapped it in but also put some epoxy sealant round the base. Ill get round to linking it with a collecting vessel/ breathing box of some sort. It may help the engine
Rev a little freer. Funny though I remember my TLR1000 which use to spin up like a 4 cylinder.

Saturday 30 March 2013

First fire up

First fire up, connected a quick release fuel line connector for ease of maintenance, highly recommended as they don't leak, self cut off  etc. fidgeted the vacuum hoses on. Let the starter run without leads on so oil is pumped around as its been sitting for months without oil.
Connected plugs and leads. Squirted ether down the funnels and thumbed the starter. Took a 30 seconds of squirting but this would make the engine fire up in spits and starts helping the fuel pump prime the carb...at the time of running, the ignition was on full advance, sounded terrifyingly loud once running...!...thumbs up to Projection components!

Friday 29 March 2013

Crankcase breather

I've put a black dot on where I'm going to drill through and tap this brass connector in. It's the flattest part of the cover, the hole should miss the wiring from the generator and pulsar pickups. Ill also use a little epoxy metal to make sure I've got a air tight seal.

Just for fun I'd thought I'd check that my home brew electrics will work. Stupidly I've wired it so its permanently on, I thought I had the stop switch wired so it cuts power to everything but didnt quite get it right. At least the rev counter lit up! With no throttle cables cut to length yet and no tank I just used some easy start ether spray just to see if it fires up. Once I'd swapped the coil leads over the bike fired up.....! Very loud!.....ill post a vid soon but I'm sure it's too loud!

Sunday 24 March 2013

The first bemsee meeting at Snetterton

This time last year it was hot and sunny and got 2 trophies at Snetterton, today it's under snow and minus 2... Picture curtesy of bemsee

Saturday racing and they all went out in the sleet.....puts the car racers to shame!

Front fairing stay and clock mount


Welldone baza from motobits, he can't measure, I asked is the distance between the bracket mounting holes 65mm, he sais yes, well it arrives and I offer it up and it doesn't fit, 10mm out. So in true British fashion instead of sending it back and waiting ages I made a bracket to fit so it could fit to the Frame stem lugs. It also pushes it out a touch which stops the brake reservoir fouling when I turn the steering. Affixed the rev counter. Its really neat and small, it just 4 digits, the engine will rev to around 10000, so 9999 will do the job.
Also trying to work out where my gps timer will go..not sure yet. and my front mudguard arrived form another bidder, lucky one got away,


Correct sprockets for a trx850 and yzf750 sprocket carrier is!

Found the correct sprockets for the trx/yfr750. The sprocket carrier has 6 holes, 150 mm diameter , the sprocket has to have an inner diameter of 130mm so it can fit on the carrier. I've gone for the 520 pitch conversion race chain and sprockets, most front sprockets fit as they have the same diameter and number of grooves. The only bike that has the same dimensions above are the yzf600 thundercat, not the r6 that I was led to believe which turned out to be dodgy advice. Luckily A and R racing are sorting this out. The earlier r6 was 145mm with 5 holes, the later r6 from 2003 had 6 holes but were 130 diam I think.

Luckily the thundercat is still catered for and renthal do a 520 race kit with a range of rear sprockets.....so use my advice above!...thundercats rule!

Wednesday 20 March 2013

Rev counter arrived today and my sprockets, however I had ordered the wrong rear sprocket, I know R 6 sprockets work but only after 2003. Ill post them back tomorrow . My rear disk should also come.
Mr r7 fairing is being made and that will arrive in a couple of weeks . Found a front faring bracket from an R1....ordered that.
An annoying thing on ebay I was bidding for a r1 front mudguard, only 9.99 I was the only bidder , the time ran until the end but it vanished...removed..that's surely wrong...if I can find the seller again ill advertise the person as someone to avoid.

Tuesday 19 March 2013

Fuel pump and wiring start

Attached fuel pump onto a small plate which joins the 2 sides of the frame together, I welded this in to strengthen the cross member which is where the tank sits.
also positioned the CID box and rectifier. Just got to work out the routing of the solenoid , rest of the loom which I've butchered . Diagram to follow.


Thursday 14 March 2013

Things ordered

I'm currently waiting for several things :

Crash bungs for frame : arrived!
Renthal sprockets and chain, 45, 46 rear, 14, 15 front.
Cheap digital tachometer
Rear disk
R7 fibreglass fairing, base top coat unfinished but in black.

Paint scheme ideas: I'm thinking of black with something.

Sunday 10 March 2013

Fcr's on!

I've put the Thermostat on to see if it fits with the R6 Radiator, top ones fit, I've had to block off the Heater hose for the carburettors as I don't need them with my fcr's. I have to block off the bottom right exit of the rad as there's no where for it to go.
The fcr fit but the original throttle cables are too long so ill take them to kempton bike jumble in 2 weeks to have them shortened or just get a fresh set made up.
Now I can't remember where the fuel hoses go from each carb! It's not even clear in the workshop manual and even the Haynes manual. I can see the fuel pump has an inlet from the tank, then exit out, and a vacuum pipe which comes from inlet tract 1 and from tank tap vacuum pipe to inlet tract 2, but how does the fuel split to both carbs?.

Saturday 9 March 2013

Re fit exhaust

The headers weren't in correctly as the exhaust seemed too low....so I've fixed that, fixed r6 radiators place, it's wider and longer, the hole positions are wider apart than standard so I made 2 spacers out of. Aluminum tube. Exhaust is just under the engine now and the exhaust can is now higher.


Tuesday 5 March 2013

Coming along

Back wheel in, needs aligning with front sprocket. I need to tinker with the exhaust bracket so it still looks unfinished and rough, I've got to raise than exhaust can up a touch and straighten it as at the moment it is angled outwards looking from the end cap direction. The tlr tank is a wide beast but does give it a different look, I haven't made my mind up yet about that.

Today I've temporary attached an r6 radiator, but I think I got the wrong model version, it might be too tall to fit leaving little room when the forks are compressed..

I've got to
1. Align sprockets( got to order some)
2. Fix the radiator.
3. Create the crankcase breather
4. Fx the exhaust.
5. Wiring loom+ tps rev limit fix
6. Clocks
7. Fairing brackets
8. Full fairing , r1, gsxr k5, r7
9. Brakes
10. Footrest hangers
11. Carb on
12. Test day, race entry with standard engine.
13. Time and money permitting......big bore kit/raised compression, race lift cams
14 make excuse to the wife that I need to spend a little more than an hour in the shed is needed.

Sunday 3 March 2013

Exhaust hanger

Knocked up an exhaust hanger, will smooth it when i know it's got the correct angle so to miss the swingarm. Tried my old tlr tank, kind of fits...not sure if its worth using as its fatter.

Got to think about the fairing soon,which one would suit best, Early R1 Or gsxr1100 2005, or R7.


Wednesday 27 February 2013

Rear frame on and battery and seat

Temporary put exhaust on to try and understand where it can go and how deep it drops under the engine. Seat temporarily fixed on the rear frame. Looks ok. Have to get a tyre put on the rear wheel. Tank sits in but might try my tlr tank.


Friday 22 February 2013

Bit more , wheel on but I've lost the proper caliper bolts.

Tuesday 19 February 2013

Monday 18 February 2013

Rebuild

Forks on in correct position now, opened out the swingarm shock hole ( about 4 mm taken off)so the Vfr shock fits without snagging, swingarm bearings re greased, no play so good to keep. All swingarm linkages attached but not torqued up. Finally positioned engine under the frame ready but just as I was getting going the wife wanted me to hold the baby..

Sunday 17 February 2013

Rebuild

Managed to get 30mins in the garage, the frame is all painted, laquered. Started of by fitting the the bottom yoke and top, making sure plenty of grease squashed in around the tapered bearings.
Just got to just open out about 4mm about 0.5 mm on the top hat spacer because the bottom thread of the stem goes into it and fouls it. The large secondary spacer I have goes above the top yoke, I did think of putting it below but that would mean the forks would be too high.


Sunday 10 February 2013

Battery box

Worked out how to fit the battery box, for now it will house a standard 4kg battery but ill lose this for a 1 kg item at some point. So the bracket fits onto the frame and the xr650 original threaded bolt holes, I drilled and tapped 6 mm into the frame cross member that I've tacked on. Next to completely pull the wiring loom apart, all the wires and redo so I only need the absolute necessary. Then i can plot where i can put the cdi, and any necessary relay. If its total loss then I won't need the rectifier.
I may alter the battery housing by using the original plastic version If I cut it out from the original plastic part...ill get on with painting the frame and start rebuilding then come back to the battery box,


Then....

Before I have to work out how the seat attaches to the rear frame, the shock preload and compression units, possible exhaust hanger position.

Weld everything, check, grind
Recheck the head stock and top yoke spacer.

Lots to do

Friday 8 February 2013